Thursday, February 22, 2018
Friday, February 16, 2018
Thursday, February 15, 2018
New Fold Techniques and Extras
This is fun and beautiful with different elements for more interest. Below is the full video tutorial for the card and the other video for the napkin fold.
Napkin fold card: https://www.youtube.com/watch?v=rYkNjhEe-XA
Measurements:
Card base 11x5 1/4 score at 5 1/4 and 5 3/4 inches
Mats are 5x5 inches
For the napkin fold part you will need to start with a piece of paper 8x8 inches, fold as shown in the above video.
If you use the envelope punch board start with a paper cut at 5x5 and use the measurements for a 5x5 piece on the punch board.
For the pouch start with a piece of paper cut at 6x6 fold in half point to point, then follow the directions in the video.
Wednesday, February 14, 2018
Tuesday, February 13, 2018
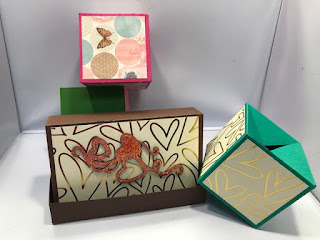
Gift Box With A Bang!
This is what will be coming on our channel tonight. We will be showing you how to create this beautiful box that holds some jumping surprises for the recipient. I can't wait for you to see it. It looks really complicated but it is very easy to make just takes a little patience.
When the box is opened the boxes jump out and form a cube. You can put up to 5 cubes in this little box and what fun when someone opens and the boxes fly out in all directions. You could put some sentiments on each for them to read.
I will post the link to the tutorial as soon as it is loaded.
Video Tutorial: https://youtu.be/wLRI1ACELQE
Hope you enjoy!


When the box is opened the boxes jump out and form a cube. You can put up to 5 cubes in this little box and what fun when someone opens and the boxes fly out in all directions. You could put some sentiments on each for them to read.
I will post the link to the tutorial as soon as it is loaded.
Video Tutorial: https://youtu.be/wLRI1ACELQE
Measurements
8 1/4x7 1/2 inches for the paper
On long side score at 2 3/4, 5 1/2
Turn and score at 2 3/4, 3 1/2, 4 1/4, 7
With 1/2" score line on right score from line to line creating a triangle in the square box
Then score from joining score lines to the line you just created (best seen in the video)
Box 7 7/8x5 1/8 score at 1 inch all the way around
top 9 1/8x5 7/8 score at 1 1/8, 4 3/8, 5 1/2, 8 3/4
Hope you enjoy!


Sunday, February 11, 2018
How Sweet The Smell!!
Have I told you I love the smell of new paper packs? And especially the brand new G45!! This week I will be able to sniff all the sweet smell out of the new packs that are arriving. We will have G45 Little Women and Sun Kissed in the house this week!! Don’t forget to go over and place your orders NOW! This way you will be able to get in on the first run.


To Order: https://www.scrapbookingwithme.com/store/p10077/G45_Little_Women_Bundle_preorder_ETA_2%2F10.html
Friday, February 9, 2018
Box With a Surprise!
The video is uploading for this beautiful box, so make sure to check the link below out to see exactly how it is made. Below are all the measurements you should need.
Video Tutorial: https://youtu.be/rYkNjhEe-XA


Video Tutorial: https://youtu.be/rYkNjhEe-XA
Cardstock 8x8 bottom of the box, score at 2 and 6, then turn and score at 2 and 6
Design paper 4 pcs cut at 3 3/4 x 1 3/4 inches, Mats
Cardstock 8 1/8x 8 1/8 inches for top, score at 1, 2, 6 1/8 and 7 1/8 inches, turn and score the same on the opposite side.
4 Mats for this piece, 3/4 x 3 7/8 inches
1 center top piece cut at 3 7/8 x 3 7/8
Mat cut at 3 3/4 x 3 3/4 inches
For inside origami fold
Can use cardstock or design paper
8x8 pc, mark the center of this paper
The folding is show in the video and is easy to follow, but very hard to write down here.
If you want to use cardstock on the origami pc and cover with pattern paper cut
4 pcs at 2 1/2 x 2 1/2 and split from on corner to the other creating a triangle
cut 8 pcs 1 5/8 x 1 5/8 inch and split from corner to corner creating triangles.
For the inside bottom cut one pc at 3 7/8 x 3 7/8 inch


Thursday, February 8, 2018
Wednesday, February 7, 2018
Monday, February 5, 2018
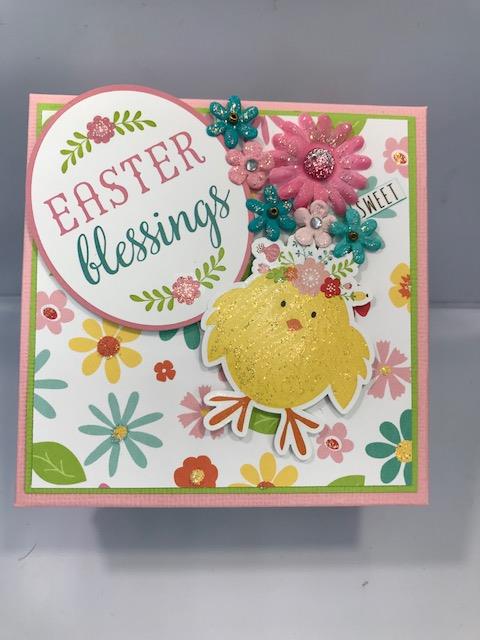
Cute and Easy Bunny Box
Today we make a cute and easy bunny box that can be used for candy, small candles and more. These are so easy and quick to make, I usually make quite a few for the kits classmates. Below are all the measurements and the link to the video tutorial.
Video tutorial:https://youtu.be/nmCGEvnMo2I

Video tutorial:https://youtu.be/nmCGEvnMo2I
Cardstock 11 1/2"x9"
On 9 inch side score at score at 2 and 6 1/4 inches
On 12" side score at 2 3/4", 5 1/2", 8 1/4" and 11"
Cut away the 2" boxes from the 1/2" score line down leaving just the one on the end.
Round the last one making the face of the bunny.
Cut away the bottom 1/2" rectangle and then cut up on score lines. Make sure you are cutting up on the bottom away from the tab we left for the face.

Friday, February 2, 2018
Thursday, February 1, 2018
I'm Back & Never Ending Card Tutorial
This is a quick and easy card that is never ending. Below is all the measurements as well as the link to the full tutorial.
Video Tutorial: https://youtu.be/6mxXbxNNOhc
You will need 8 pieces of paper that are 3"x6"
on the 3" size score at 1 1/2"
Turn to the 6" side and score at 1 1/2", 3", 4 1/2"
Score all 8 sheets the same way.
Prefold and reinforce the score lines.
Place two sheets of these together and you will put glue on the four outside corners only as shown in the video. Place two of the other sheets on top in the opposite direction, and glue together using the four corner glued places. You will need to watch the video to see just how you continue from here, it is to difficult to write it down.
Embellish as you wish.


Subscribe to:
Posts (Atom)