
Friday, December 28, 2018
Tuesday, December 11, 2018
Snowman Treat/Candle Box
Another quick and easy craft is loading up. These are super simple but make the cutiest little gift holders. This is 2 1/2"x3"x3" so it will hold a candle, cookies or lots of treats. Great for office parties.
YouTube tutorial: https://youtu.be/C6AUBmX_J0Q
Products used:
Cricut Glitter paper: http://shrsl.com/1c9kt
Non Stick Mat: http://bit.ly/2EeW36i
Measurments:
Cardstock 8 1/2x9 inches score on the 8 1/2" side at 3" and 5 1/2" then turn and score on the 9" side at 3" and 6". Cut up on all for score lines at the corner square boxes and cut away about 1/3 of the tab left.
The hat is cardstock 5"x4 3/4" and scored at 1" on all 4 sides, cut up on score lines and wedge.
The red rim bor the hat is 1/2"x12".
Pink circles for cheeks are 1/2" circle, and the other dots I punched with my hole punch. These are used for the eyes and the mouth. I just cut a small triangle for the nose.

YouTube tutorial: https://youtu.be/C6AUBmX_J0Q
Products used:
Cricut Glitter paper: http://shrsl.com/1c9kt
Non Stick Mat: http://bit.ly/2EeW36i
Score Board: http://bit.ly/2GRRf9u
Tim Holtz Scissors: http://bit.ly/2J3lh77
Score Board: http://bit.ly/2NTdtXI
TH Glass mat: http://bit.ly/2vXmrvP
Foam Tape: https://amzn.to/2IOrGTH
Pick Up Tool: http://bit.ly/2zMUWKx
Art Glitter Glue: http://bit.ly/2FGCXmz
TH Ruler: http://bit.ly/2DK7dxOMeasurments:
Cardstock 8 1/2x9 inches score on the 8 1/2" side at 3" and 5 1/2" then turn and score on the 9" side at 3" and 6". Cut up on all for score lines at the corner square boxes and cut away about 1/3 of the tab left.
The hat is cardstock 5"x4 3/4" and scored at 1" on all 4 sides, cut up on score lines and wedge.
The red rim bor the hat is 1/2"x12".
Pink circles for cheeks are 1/2" circle, and the other dots I punched with my hole punch. These are used for the eyes and the mouth. I just cut a small triangle for the nose.

Monday, December 10, 2018
Quick and Easy Gift Box and a $2.50 Gift Idea For The Kids
Here is a quick and easy gift box for those light gifts such as scarfs, gloves, small tea light candles etc. You could make it from cardstock and make it stronger but for these items it is good. I like making boxes like this for the little items my kids take to school. Also look below and see the gift I will be giving all the kids in my 6 year old granddaughters classroom. I am sure they will have a lot of fun with them and they only cost $2.50 for each child. Can't beat that.
https://arteza.com/b/markers?utm_source=influencer&utm_medium=blog&utm_campaign=ScrapbookingWithME
YouTube tutorial:
Products Used: https://youtu.be/vUGiw39zspk
Arteza Dry Erase Boards: http://shrsl.com/1c6zo
Arteza Dry Erase Markers: http://shrsl.com/1c6zp
Arteza Dry Erasers: http://shrsl.com/1c6zr
***use code EDITHWRAY2***
Cardstock Celebrate Christmas: https://amzn.to/2PvDyN8
The measurments are below as well as the photo for these.
12x12 sheet of paper score at 2",5", 7", 10" turn one turn and score at 2" and 10"
Cut up on the 2,5,7,10 inch score lines just to the cross scored line. Put glue on all the squares and glue them inside the rectangles. Creating the box and the lid at the same time.
How easy is that. Decorate as you wish.

https://arteza.com/b/markers?utm_source=influencer&utm_medium=blog&utm_campaign=ScrapbookingWithME
YouTube tutorial:
Products Used: https://youtu.be/vUGiw39zspk
Arteza Dry Erase Boards: http://shrsl.com/1c6zo
Arteza Dry Erase Markers: http://shrsl.com/1c6zp
Arteza Dry Erasers: http://shrsl.com/1c6zr
***use code EDITHWRAY2***
Cardstock Celebrate Christmas: https://amzn.to/2PvDyN8
Score Board: http://bit.ly/2GRRf9u
Tim Holtz Scissors: http://bit.ly/2J3lh77
Score Board: http://bit.ly/2NTdtXI
TH Glass mat: http://bit.ly/2vXmrvP
Foam Tape: https://amzn.to/2IOrGTH
Pick Up Tool: http://bit.ly/2zMUWKx
Art Glitter Glue: http://bit.ly/2FGCXmz
TH Ruler: http://bit.ly/2DK7dxO
Shop Cricuts HUGE SALE: http://shrsl.com/1byj2
***spend $50 or more and use this code to
Get another
10% off MELODYLANE***
Shop our Amazon Store: https://amzn.to/2v02Gqi
****don’t see what you are looking for, just do
a search
and
we will still get the credit for your purchase***
***use our code EDITHWRAY2 to get an additional
10% off***
------------------------------------------------------------------------------------------------------------------
The measurments are below as well as the photo for these.
12x12 sheet of paper score at 2",5", 7", 10" turn one turn and score at 2" and 10"
Cut up on the 2,5,7,10 inch score lines just to the cross scored line. Put glue on all the squares and glue them inside the rectangles. Creating the box and the lid at the same time.
How easy is that. Decorate as you wish.


Wednesday, December 5, 2018
Last Minute Gift Ideas - Hot Cocoa & Marshmellow Pockets
This is the time of year when we all feel the crunch. Time to get those last minute gifts out and hutty! I am putting together a few last minute gift ideas that will only take minimual supplies and very little time out of your busy day. Hope you enjoy them.
YouTube tutorial: https://youtu.be/vHJX9U68zLM
Products Used:
Here are the measurements for this piece.
Pockets are cut at 7 1/2x4 1/2 on long side score at 1/2, 1 6 1/2 and 7 inches. Turn score at 1/2, 3 1/2 and 4 inches. Cut away corner boxes and clue these together forming your pockets.
Outside is cut at 5 1/2x12 inches. You will score on the long side at 5 1/2 and 5 1/2". Round corners. If you are wanting to make a hand hold then cut this in the ends of the long piece now. As shown in the video. Glue your pockets in with the open part at the top away from score line. Glue the bottom on the score lines on each side. Decorate the front of pocket if you want. And embellish the outside.
That is it, you are finished. Add your goodies and ribbon to close and you are all set for a last minute gift, that anyone will enjoy.
Thanks for watching, E


YouTube tutorial: https://youtu.be/vHJX9U68zLM
Products Used:
Cottage nested ovals: https://amzn.to/2QE2ztZ
Tim Holtz die woodland: https://amzn.to/2UkhFE0
Martha Steward edge punch: https://amzn.to/2E22bPe
EK scallop punch 2 ¼”: https://amzn.to/2PixffL
Here are the measurements for this piece.
Pockets are cut at 7 1/2x4 1/2 on long side score at 1/2, 1 6 1/2 and 7 inches. Turn score at 1/2, 3 1/2 and 4 inches. Cut away corner boxes and clue these together forming your pockets.
Outside is cut at 5 1/2x12 inches. You will score on the long side at 5 1/2 and 5 1/2". Round corners. If you are wanting to make a hand hold then cut this in the ends of the long piece now. As shown in the video. Glue your pockets in with the open part at the top away from score line. Glue the bottom on the score lines on each side. Decorate the front of pocket if you want. And embellish the outside.
That is it, you are finished. Add your goodies and ribbon to close and you are all set for a last minute gift, that anyone will enjoy.
Thanks for watching, E


Tuesday, December 4, 2018
Open Door Christmas Card Tutorial
This is a beautiful Christmas Card Door that would be lovely given to a teacher, postman, UPS driver or just anyone in between. It is quick and easy. All the products used that I could find are linked below as well as the video tutorial and measurements.
YouTube Video: https://youtu.be/BzSPgzP3bUY
Products used:
Nuvo White Bizzard : https://amzn.to/2KYk3w0
Silent night Stamp: https://amzn.to/2L12wmZ
The base of the card is 7"x12" and you will score at 3 and 9 inches.
Cut panels out of the same cardstock at 2 @ 2 3/4"x4"
2@ 2 1/2"x3 3/4"
2@ 2 3/4"x2 1/2"
2@ 2 1/2"x2 1/4"
Inside white piece is cut at 5 3/4"x6 3/4"

Wednesday, November 28, 2018
Santa Suit Table Favor
Today we are working on our table favors and we wanted to take you along with us. We hope you enjoy the full totorial and if you make these please share them on our Facebook Group. We use just some red bazzil cardstock, black and white. Below you will find all the links for the products used as well as the link to the full tutorial on YouTube.
Products used:
Discount code for our store is THANKFUL to get 40% off.
Red Cardstock: https://amzn.to/2PchtTG
Black Cardstock: https://amzn.to/2P5BvPu
Silver Cardstock: https://amzn.to/2rbVfay
White Cardstock: https://amzn.to/2P2hysV
Tim Holtz Ruler: http://bit.ly/2DK7dxO
Cricut paper trimmer: http://shrsl.com/1bb7x
get 10% off if you have access and another 10% off
if you use the code MELODYLANE. Spend $50 and
get FREE shipping.
Pick up tool: https://amzn.to/2TVs8Fy
Scallop Die Set: https://amzn.to/2P8DP8g
Scallop Punch: https://amzn.to/2r9PPgh
Tim Holtz Scissors: http://bit.ly/2TXMZZd
Art Glitter Glue: Sorry we can't ship this until spring
Score Board: http://bit.ly/2Q1Ne75
Bone Folder: https://amzn.to/2Skj0sI
You will need two sheets of cardstock cut at 5x6", on the 6" side score at 2 1/2" and 3" turn and on the 5" side score at 1/2" and 4 1/2". Cut up on the small tab in the center and glue these together making a box. The back side is the long side.
You will need another piece of cardstock that is cut at 4"x12" score in the center at 6". This will then glue down into the pockets, leaving the folded side at the top. Then glue the back sides together.
Cut you white strips as follows. 1 at 1"x12" this will be scored at 6" and placed in the center to form the lapel of the suite as shown in the video and photos.
2 white pieces cut at 1"x3" these will glue on the front of the two boxes even with the lapel piece to seem as though the lapel goes all the way to the bottom. Fold over the bottoms and glue.
2 Tags cut at 1 1/2x2" and round all 4 corners, punch a small hole in the top and stamp or write a name on them.
Buckle - silver piece is cut at 1 3/4"x1 1/2" you will need 2
Black piece is cut at 1x1 1/2" you will need 2.
Beard scollop is 3 1/2" and 2 1/2"
Thanks and hope you enjoy these.
Please make and share on our Facebook group the link is above.


Tuesday, November 27, 2018
Wednesday, November 21, 2018
Tuesday, November 20, 2018
Finishing Our Holiday Planner with Inserts, Pockets and GIVEAWAY - FREE PDF !
We are finishing up our holiday planner today and tomorrow just in time!! I have the PDF ready and waiting for you the link is below. The pocket pages tutorial is listed below as well and tomorrow we will finish up with the binding system. I hope you are enjoying putting this together as much as I am. I love all my planners and can't wait to get started using this one. I do have a giveaway with this planner all you need to do is watch the video tomorrow on our binding to see what you need to do to enter.
Thank you guys so much for following along with us on our Chirstmas Village House & Church and holiday planner journey. It just wouldn't be the same without you.
Get all the links below, hope you enjoy and don't forget to share yours with us on our FB page.
Facebook page: /https://www.facebook.com/groups/350219338419615/
YouTube tutorial: https://youtu.be/K3o_cFmrzbghttps://youtu.be/K3o_cFmrzbg
Free PDF: http://bit.ly/2TrXgfF
Products Used:
Laminator: https://amzn.to/2CoNrsX
Laminator pouches: https://amzn.to/2CRbEJw
Tim Holtz Inks: https://amzn.to/2pQoOOk
Cricut Trimmer: http://shrsl.com/16ve1
3D foam Tape: https://amzn.to/2nkuE9B
Tim Holtz Oxide Inks: https://amzn.to/2pQoOOk
Scor Tape: http://bit.ly/2H0Q5Yo
Tim Holtz Scissors: http://bit.ly/2J3lh77
Score Board: http://bit.ly/2NTdtXI
TH Glass mat: http://bit.ly/2vXmrvP
Foam Tape: https://amzn.to/2IOrGTH
Pick Up Tool: http://bit.ly/2zMUWKx
Art Glitter Glue: http://bit.ly/2FGCXmz
TH Ruler: http://bit.ly/2DK7dxO
Cricut Craftboard: https://amzn.to/2yMoGnh
Basic Grey Magnets: http://bit.ly/2K3Hr9M
Chipboard: http://bit.ly/2Mfy4cm


Monday, November 19, 2018
Christmas Village Church Decorating
Below you will find all the links for the free PDF, Cricut Cut file and YouTube totorials. We will add the base, the fence and more decor tomorrow. Thanks for watching and following along with us.
YouTube Church Play List: https://youtu.be/fJnHuFKAzMI
PDF For Chruch: http://bit.ly/2DzgbRb
Cricut Cut File: http://bit.ly/2RNIRsL
House PDF File: http://bit.ly/2yNSQqN
House Play list: http://bit.ly/2Ot254I
House Cricut cut file: http://bit.ly/2yNSQqN
Products Used:


YouTube Church Play List: https://youtu.be/fJnHuFKAzMI
PDF For Chruch: http://bit.ly/2DzgbRb
Cricut Cut File: http://bit.ly/2RNIRsL
House PDF File: http://bit.ly/2yNSQqN
House Play list: http://bit.ly/2Ot254I
House Cricut cut file: http://bit.ly/2yNSQqN
Products Used:
Gesso: https://amzn.to/2Kf1V0x
Gold Vellum: https://amzn.to/2DOP4Sl
Cricut Acrylic foil Accents: http://shrsl.com/1ajru
USE CODE MELODYLANE TO GET 10% OFF
Vellum Tape Runner: http://bit.ly/2zhuINJ


Wednesday, November 14, 2018
Monday, November 12, 2018
Christmas Village Church
Below you will find all the links for the free PDF, Cricut Cut file and YouTube totorials.
PDF For Chruch: http://bit.ly/2DzgbRb
Cricut Cut File: http://bit.ly/2RNIRsL
House PDF File: http://bit.ly/2yNSQqN
House Play list: http://bit.ly/2Ot254I
House Cricut cut file: http://bit.ly/2yNSQqN
PDF For Chruch: http://bit.ly/2DzgbRb
Cricut Cut File: http://bit.ly/2RNIRsL
House PDF File: http://bit.ly/2yNSQqN
House Play list: http://bit.ly/2Ot254I
House Cricut cut file: http://bit.ly/2yNSQqN
Monday, November 5, 2018
Saturday, November 3, 2018
Friday, November 2, 2018
Christmas Village House - Base
The base is cut at 10”x11”. Cut the sides of base at 1”x10” cut 2, And 1”x11” cut 2
Video shows how this is put together.
Cricut Cut File: http://bit.ly/2qpOUrH
Other videos will start on Monday.
Wednesday, October 31, 2018
Friday, October 26, 2018
Thankful Thoughts Mini Album Page #3 with Cascading and Vellum
Mini album Page #3
YouTube Tutorial:
Click here for the Cricut cut file: http://bit.ly/2yXYFBf
(NOTE: if you don't have cricut access then some of these may not work for you. I do not charge for my files so if it ask you to pay
that is not me it is cricut.
PDF File: https://docs.google.com/document/d/1NgiWkq1-K_L2ntbaCY3j5ztLmbCG-zZtnDylPGpGhYo/edit?usp=sharing
Pages base is the same as above pages
The cascading part I explain on the video and the sizes are listed below.


Thursday, October 25, 2018
Mini Thankfulness Page 3 Lots of Flips and pockets
Pocket #2 and inserts for our mini
Click here for the Cricut cut file: http://bit.ly/2yXYFBf
(NOTE: if you don't have cricut access then some of these may not work for you. I do not charge for my files so if it ask you to pay
that is not me it is cricut.
PDF File: https://docs.google.com/document/d/1NgiWkq1-K_L2ntbaCY3j5ztLmbCG-zZtnDylPGpGhYo/edit?usp=sharing
The page is cut the same as the second page up to the flap, then we need to cut a belly band that is 2 ¾”x8”. I cut mine this wide to uses my border punch on each side if you don’t want to use the punch you can make it smaller. The mat for the belly band is 2”x7 ¼”
Top note is below as well as the tabs.


Wednesday, October 24, 2018
The Thankful Mini Pages and Inserts
YouTube Video:
Pockets and inserts for our mini album
Base pocket is 8 ½”x5 ½” score on long side at ½” on each end
Top of the base pocket is cut at 7 ½”x5 ½” fold flaps in and glue this piece on top
Flap for the pocket page is cut at 6”x7 ½” score on short side at ½” just on one end
Front decorative doors are cut at 3 ½”x7 ½” score at ½” on long side
Pocket insert is cut at 5”x7 ¼”
Front mat for the decorative piece is cut at 2 ¼”x7 ¼” you will need two for outside and two for inside.
Inside large mats are cut at 5 ¼”x7 ¼” you will need 4 of these to cover all areas
Insert mat is cut at 5”x7” you will need two to cover front and back of insert.
Insert mat is cut at 5”x7” you will need two to cover front and back of insert.


Tuesday, October 23, 2018
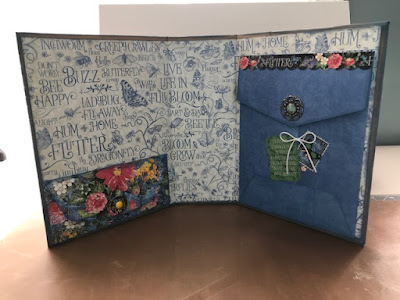
Mini Album 30 Days of Thankfulness
Today we created a November Thankfulness album, we started with the front and inside covers with a couple of pockets. We will add pages, pockets and inserts tomorrow and Thursday. Make sure to check in the description below for the PDF and the cricut cut file for the pockets we have used this far. We will be adding the other images on as we make them.
Click here for the instructions and the PDF file. http://bit.ly/2PgKz8f
Click here for the Cricut cut file: http://bit.ly/2yXYFBf
(NOTE: if you don't have cricut access then some of these may not work for you. I do not charge
for my files so if it ask you to pay that is not me it is cricut.)
Products Used:
Arteza Selfhealing mat, Rotary Cutter & Acrylic ruler: http://shrsl.com/18m7w
(USE CODE EDITHWRAY1 TO GET 10% OFF)
Chipboard: http://bit.ly/2Mfy4cm
KC Kraft cardstock: https://amzn.to/2D1wBlc
G45 Flutter Collection: http://bit.ly/2yzdYRz
1/2" circle punch: https://amzn.to/2q9cRDG
Cricut Maker: http://shrsl.com/175he
Cricut Access: http://shrsl.com/175hf
ATG Gun: https://amzn.to/2K9NM7c
ATG Tape: http://bit.ly/2Kd4diS
Tim Holtz Inks: https://amzn.to/2pQoOOk
Cricut Trimmer: http://shrsl.com/16ve1
Scor Tape: http://bit.ly/2H0Q5Yo
Tim Holtz Scissors: http://bit.ly/2J3lh77
Score Board: http://bit.ly/2NTdtXI
TH Glass mat: http://bit.ly/2vXmrvP
Pick Up Tool: http://bit.ly/2zMUWKx
Art Glitter Glue: http://bit.ly/2FGCXmz
TH Ruler: http://bit.ly/2DK7dxO
Neenah Cardstock: http://bit.ly/2Icxdqc
Blending
tool: http://bit.ly/2MvB8NT
Score Board: http://bit.ly/2GRRf9u


Friday, October 19, 2018
Thursday, October 18, 2018
Saturday, October 13, 2018
Friday, October 12, 2018
Tuesday, October 9, 2018
Friday, October 5, 2018


Thursday, October 4, 2018
Wednesday, October 3, 2018
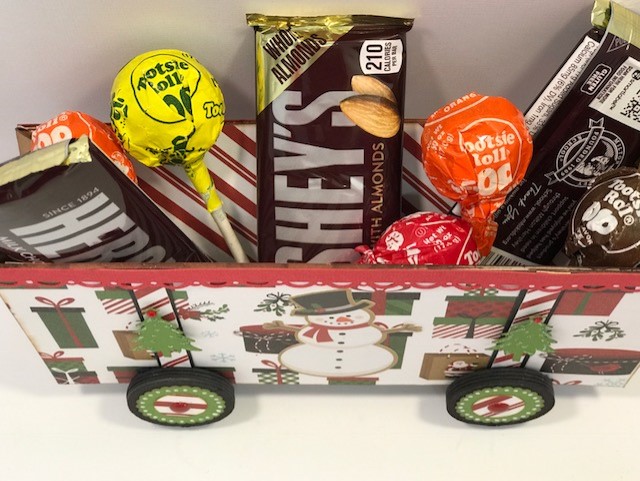
Antique Christmas Train Part 2 - The Carrier
Christmas Train Part 2 - The Carrier
Created by Edith Wray
Cricut Cut File: http://bit.ly/2QuO2gF
PDF File: http://bit.ly/2NisjXf
For all the products used please see below the video Here.

Wheels are cut at 1 ½”, scallop 1 ¼” and center ¾” 

Back and Front of the carrier cut at 8”x4”

Side Accordion Pieces
These two pieces are cut at 4”x4” and scored every half inch.
Bottom accordion cut at 4”x8” and scored the long way at every half inch.
Small strips for the sides are cut at ½”x4” and mat is ⅜”x4”
Inside mats are cut at 7 ½”x3 ½”
Tuesday, October 2, 2018
Christmas Train Series Part 1 - Engine
This is the first part of our Christmas train series, the engine. All the photos, PDF file and YouTube tutorial links are below. The Cricut cut file is linked under the video.
Hope this helps, I am not so good with PDF and cut files, sorry. I am trying to learn so I can share with you guys.
YouTube tutorial: https://youtu.be/O6Xf41aRnJw
Cricut Cut File: http://bit.ly/2NWjGqr
PDF File: Christmas Train: http://bit.ly/2zMW7I3
Products Used:
The overall size of the chipboard before cutting out pieces is 6x6
The large wheel is 2" circle with a red piece that is 1 1/5" and white piece that is 1 1/4"
The small wheels are 1 1/4" with a 5/8" piece in the center
Little red stripes on the front are cut at 1/4"x1 1/4"
Little circles are just cut from a cricut file, any punch or file that has a swirl will do.
All white dots on wheels and swirls on roof are made using a sharpie pen.
I used bakers twine on the little wheel to make the bow, and just a button under that.
Little red strip between the tires is 1/4"x1 1/4"
I use a sharpie to draw lines on the "cow catcher" on front.


Hope this helps, I am not so good with PDF and cut files, sorry. I am trying to learn so I can share with you guys.
YouTube tutorial: https://youtu.be/O6Xf41aRnJw
Cricut Cut File: http://bit.ly/2NWjGqr
PDF File: Christmas Train: http://bit.ly/2zMW7I3
Products Used:
Cricut Maker: http://shrsl.com/175he
Cricut Access: http://shrsl.com/175hf
Cricut Trimmer: http://shrsl.com/16ve1
Chipboard: http://bit.ly/2Mfy4cm
3D foam Tape: https://amzn.to/2nkuE9B
Tim Holtz Oxide Inks: http://bit.ly/2xR6lV8
Ink Blinding tools: https://amzn.to/2zMCuja
Scor Tape: http://bit.ly/2H0Q5Yo
Bone Folder: http://bit.ly/2DcBELW
Stainless Steel Pins: http://bit.ly/2QoR1a9
Snowfalke Paste: https://amzn.to/2QskrEx
Tim Holtz Scissors: http://bit.ly/2J3lh77
Score Board: http://bit.ly/2NTdtXI
TH Glass mat: http://bit.ly/2vXmrvP
Foam Tape: https://amzn.to/2IOrGTH
Pick Up Tool: http://bit.ly/2zMUWKx
Art Glitter Glue: http://bit.ly/2FGCXmz
TH Ruler: http://bit.ly/2DK7dxO
Hot Glue Sticks: https://amzn.to/2OsqXhf
Basic Grey Magnets: http://bit.ly/2K3Hr9MThe overall size of the chipboard before cutting out pieces is 6x6
The large wheel is 2" circle with a red piece that is 1 1/5" and white piece that is 1 1/4"
The small wheels are 1 1/4" with a 5/8" piece in the center
Little red stripes on the front are cut at 1/4"x1 1/4"
Little circles are just cut from a cricut file, any punch or file that has a swirl will do.
All white dots on wheels and swirls on roof are made using a sharpie pen.
I used bakers twine on the little wheel to make the bow, and just a button under that.
Little red strip between the tires is 1/4"x1 1/4"
I use a sharpie to draw lines on the "cow catcher" on front.


 | ||
|
Thursday, September 27, 2018
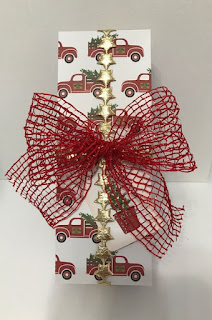
Christmas Card & Envelope Purse Holder
Quick and easy project but oh what a great gift for someone. Give it a little early full of beautiful cards and slip the postage stamps in so they will have all they need to mail out their Christmas cards.
Hope you enjoy.
YouTube tutorial: https://youtu.be/cYEmFrDRXBE
Products used:
Measurements:
12x8 inch paper score on long side at 1/2", 5", 7", 11 1/2"
Measure in 1/2" on ends and cut away creating a slant as in the photo.
Cut 2 pieces 3x4 1/2 score on all 4 sides trim away one end of the squares, cut the others just down to score line and glue.
2 pieces cut at 2x12 inches score at 1" all the way down the short side fold together and glue.
Mats are cut at 7 3/4x4 1/4"
Inside pocket is cut at 3 1/4x3 1/4" score on 3 sides at 1/4" cut away corner squares and put glue on the flaps and glue inside your purses.
Closure 3x6" score at 1/2" on all sides cut away corners and fold over and glue the flaps.


Hope you enjoy.
YouTube tutorial: https://youtu.be/cYEmFrDRXBE
Products used:
Christmas Magic paper: http://bit.ly/2xEDi8g
Cricut Trimmer: http://shrsl.com/16ve1
Scor Tape: http://bit.ly/2H0Q5Yo
Tim Holtz Scissors: http://bit.ly/2J3lh77
Score Board: http://bit.ly/2NTdtXI
TH Glass mat: http://bit.ly/2vXmrvP
Foam Tape: https://amzn.to/2IOrGTH
Pick Up Tool: http://bit.ly/2zMUWKx
Art Glitter Glue: http://bit.ly/2FGCXmz
TH Ruler: http://bit.ly/2DK7dxO
Measurements:
12x8 inch paper score on long side at 1/2", 5", 7", 11 1/2"
Measure in 1/2" on ends and cut away creating a slant as in the photo.
Cut 2 pieces 3x4 1/2 score on all 4 sides trim away one end of the squares, cut the others just down to score line and glue.
2 pieces cut at 2x12 inches score at 1" all the way down the short side fold together and glue.
Mats are cut at 7 3/4x4 1/4"
Inside pocket is cut at 3 1/4x3 1/4" score on 3 sides at 1/4" cut away corner squares and put glue on the flaps and glue inside your purses.
Closure 3x6" score at 1/2" on all sides cut away corners and fold over and glue the flaps.


Wednesday, September 26, 2018
Open Face Card
This card is quick and easy and takes just a few supplies you already have around your craft room.
YouTube tutorial: https://youtu.be/W3FyqgYwqxo
Cardstock: 5 1/2x8 1/2 score at 4 1/4 on long side.
On front panel of card base marke down 1 1/4" and up 1" this part in the center is the part you will cut away. Use your acrylic or acetate, to cover where you just removed the piece.
Mats for the top are cut at 1"x5 1/4" for top and 3/4"x5 1/4" for bottom.
Trees are freehand, I cut a square at 1"x 2 1/2" marked the center of the top and then joined the bottom corner to this mark cutting away to create the triangle tree. I just matted them but doing the same process but a little larger 1 1/4x2 3/4".
Cut your three stars for the top
Cut a 1x1 inche square for the bottom box holder and then angle cut it up to make it look like a flower pot.
Cut a little stem for each and glue on the front. Decorate as you wish.
It is just that easy.

Saturday, September 22, 2018
Thursday, September 20, 2018
Fancy Fold Christmas Forest Card and Free SVG Cut File
This is the tutorial and SVG file for one of the cards we did at Made It Con. All other card tutorials we did in this class are linked below.
Fancy Fold Card Christmas Forest tutorial: https://youtu.be/PuNe9bgW6i8
Christmas Tree Ribbon fold Card: https://youtu.be/yCL6cLLYlNY
Pop Up Birthday Card: https://youtu.be/Va4v37tnlB4
Product List:
Stampendous Stamp: https://amzn.to/2pqLXa1
Stamp Pockets: https://amzn.to/2O0WTJ8
Archival Ink Olive: https://amzn.to/2O5HQOF
TH Glass mat: http://bit.ly/2vXmrvP
Score Board: http://bit.ly/2NTdtXI
Art Glitter Glue: http://bit.ly/2FGCXmz
TH Ruler: http://bit.ly/2DK7dxO
Free SVG cut file: http://bit.ly/2xsp5eG
Free Christmas Ribbon Fold Card Cut File is below in the photos
Fancy Fold Card
“Christmas Forest”
On the black cardstock score at 1”,
2”, 2 ¾”, 4”, 4 ¾”, 6 ¾”
Turn to the right and score at 1 and
6 – At the 2” and 5” just score down to the 4th horizontal score
line or the 4” horizontal score line.
Fold @ 4 ¾” score line and at the 1”
vertical score line cut to the next score line which will be the 6 ¾”, cutting through
both sides. Turn to the other end and repeat the process.
At the 2” and 5” make a cut from 1”
to 4” horizontally.
Stamp on the green paper if desired.
Mats are cut as follows.
1 – ¾”x 6 ¾” 1 – ¾”x2 ¾” 2- ½”x2 ¾”
1 – 1”x2 ¾”
2 – 1 ½”x1 ¾” 6 – ¾”x1 ¾” 1 – 1 ¾”x4 ¾” 1 – 2”x6 ¾”
The white paper is cut and stamped
for you, these will go on the two largest panels.


 You just print and cut this template, this is a lot of copies.
Subscribe to:
Posts (Atom)